Schlüter-KERDI-BOARD-NLT  Niche set with LED lighting

The prefabricated niche sets made of KERDI-BOARD and featuring plug-and-play LIPROTEC-LED technology are an ideal combination of functionality and design. Not only can you choose from five different dimensions, but you can also define the light colours and select the position of the LED strips. When integrated into the Schlüter-KERDI waterproofing system, KERDI-BOARD-NLT also serves as bonded waterproofing.


  • Walls in interior spaces
  • Shower walls
  • Low assembly height
  • plug-and-play
  • Available as a set
  • IP X7
Product image KERDI-BOARD-NLT 1©Schlüter-Systems KG
Product image KERDI-BOARD-NLT 2©Schlüter-Systems KG
Product image KERDI-BOARD-NLT 3©Schlüter-Systems KG
Product image KERDI-BOARD-NLT 4©Schlüter-Systems KG
Product image KERDI-BOARD-NLT 5©Schlüter-Systems KG
Product image KERDI-BOARD-NLT 6©Schlüter-Systems KG
Product image KERDI-BOARD-NLT 7©Schlüter-Systems KG
Illustration KERDI-BOARD-NLT 1©Schlüter-Systems KG
Illustration KERDI-BOARD-NLT 2©Schlüter-Systems KG
Illustration KERDI-BOARD-NLT 3©Schlüter-Systems KG
Illustration KERDI-BOARD-NLT 4©Schlüter-Systems KG
Illustration KERDI-BOARD-NLT 5©Schlüter-Systems KG
Illustration KERDI-BOARD-NLT 6©Schlüter-Systems KG
Illustration KERDI-BOARD-NLT 7©Schlüter-Systems KG
Illustration KERDI-BOARD-NLT 8©Schlüter-Systems KG
Illustration KERDI-BOARD-NLT 9©Schlüter-Systems KG
zoom_out_map search
Product image KERDI-BOARD-NLT 1
Product image KERDI-BOARD-NLT 2
Product image KERDI-BOARD-NLT 3
Product image KERDI-BOARD-NLT 4
Product image KERDI-BOARD-NLT 5
Product image KERDI-BOARD-NLT 6
Product image KERDI-BOARD-NLT 7
Illustration KERDI-BOARD-NLT 1
Illustration KERDI-BOARD-NLT 2
Illustration KERDI-BOARD-NLT 3
Illustration KERDI-BOARD-NLT 4
Illustration KERDI-BOARD-NLT 5
Illustration KERDI-BOARD-NLT 6
Illustration KERDI-BOARD-NLT 7
Illustration KERDI-BOARD-NLT 8
Illustration KERDI-BOARD-NLT 9

General product information

What this product does

Prefabricated Schlüter-KERDI-BOARD-NLT sets with LIPROTEC technology let you install illuminated niches in wall areas of all kinds.

The niches are available with a variety of dimensions and light colours.

Within the recess, the LED modules supplied can be positioned at the front edge, in the centre or directly on the back wall where tiling is to be laid. For this purpose, the LED modules are available in different lengths as plug-and-play elements.

You can request the product data sheet compliant with Directive (EU) 2019/2015 here: certification-eu@schlueter.de

How to install this product

Installation in Schlüter-KERDI-BOARD:

  1. After positioning and precise marking of the outer niche dimensions, cut out the appropriate opening in the wall panelling.
  2. Fix the inserted niche in place with wood or installation screws, depending on the substrate material. The maximum spacing of the screws is 250 mm. Use KERDI-BOARD-ZT retaining washers. Screws must be set into the abutting joints.

    For additional fastening, KERDI-FIX adhesive can be applied to the inside of the flange of the niche.

  3. If the material is installed in a wetroom, the joints around the outer edge must be covered using Schlüter-KERDI-COLL-L and the supplied KERDI waterproofing collar.

Installation in plasterboard or other panelling:

  1. After positioning and precise marking of the outer niche dimensions, cut out the appropriate opening in the wall panelling.
  2. Fix the inserted niche in place with wood or installation screws, depending on the substrate material. The maximum spacing of screws is 250 mm. Place the screws through the niche flanges (spacing approx. 6 mm from the external edge).

    For additional fastening, KERDI-FIX adhesive can be applied on the inside of the niche flange.

  3. Walls in wetroom areas must be waterproofed with Schlüter-KERDI. Affix the KERDI waterproofing collar supplied onto the flanges of the niche with KERDI-COLL-L. A hydraulically setting thin-bed mortar can be used for the remainder of the wall area (see product data sheet 8.1 for installing Schlüter-KERDI). Finally, cut out the KERDI membrane in the area of the niche cavity.

Important:

Observe following installation notes when fitting niches with additional intermediate shelves:

Start by marking the desired position along the lower edge of the intermediate shelf.

Fully embed the tiles in the front and side areas of the niche – from there downwards – in the thin-bed mortar. To install the shelves, apply thin-bed mortar on their sides and rear and fit them into the niche so they are supported by the tiles that were laid beforehand.

Recommendation: In installations in wetrooms, fit the shelf with a slight slope toward the front. As an alternative, you can install the tiles with a gradient leveller in the thin-bed mortar. This ensures that no water can accumulate in the niche during use.

KERDI-BOARD-NLT:

  1. Install the niche as described above. Prior to fitting the niche, connect the lead-out cable of the niche to the connector cable.
  2. Please refer to the corresponding operating instructions for installing the cables, the power supply and the controller.
  3. The cap of the pass-through socket can be easily split at the designated points if required for cable positioning.
  4. Place the cap or cap parts into the pass-through socket such that the cable can be connected to the carrier profile.
  5. Affix the self-adhesive KERDI waterproofing strip so that the gaps around the lead-out cable on both sides are sealed. Cut a small opening in the self-adhesive KERDI waterproofing membrane for the cable to pass through; this prevents adhesive penetrating into the pass-through socket.
  6. Apply tile adhesive with a notched trowel.
  7. Guide the cable through the cable opening of the carrier profile.
  8. Press the perforated anchoring leg of the carrier profile into the adhesive and align it
  9. Firmly press the adjacent tiles into place and align them so that they are flush with the upper profile edge. All tiles in the profile area must be embedded over their entire area.
  10. Leave a joint of approximately 1.5 mm between the carrier profile and the tile. This should later be completely filled with grout.
  11. Make sure the tiles and adhesive do not exceed an overall thickness of 12 mm when tiling the side walls.
  12. The RGB+W LED tube can be cut to size to suit the opening dimension of the tiled niche.
  13. Connect the LED tube to the lead-out cable using the plug-in connector and press it carefully into the carrier profile.

What this product is made from

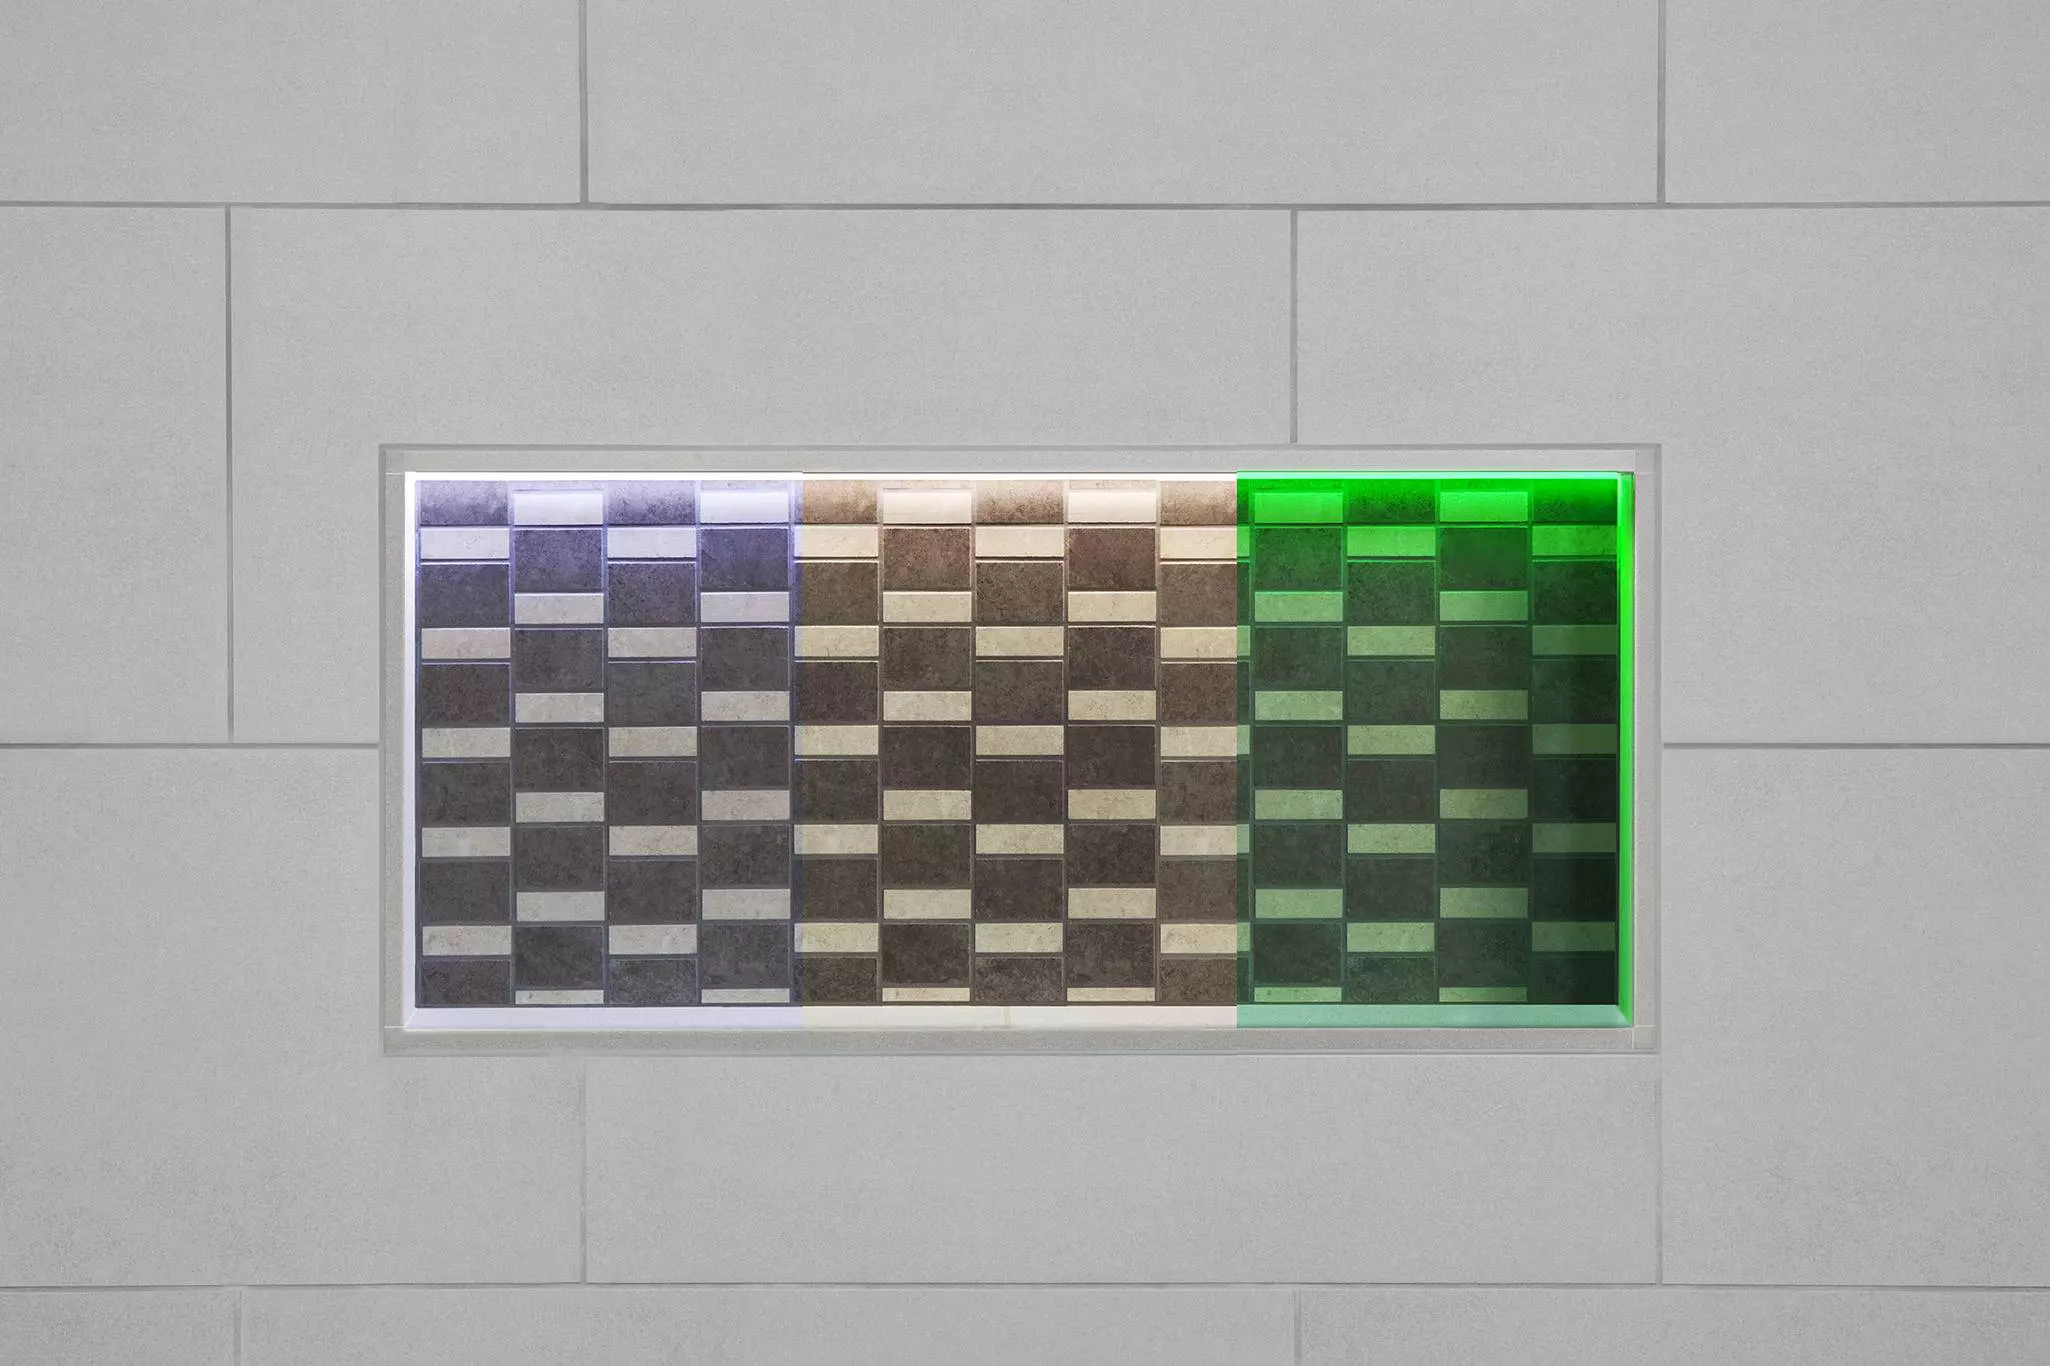
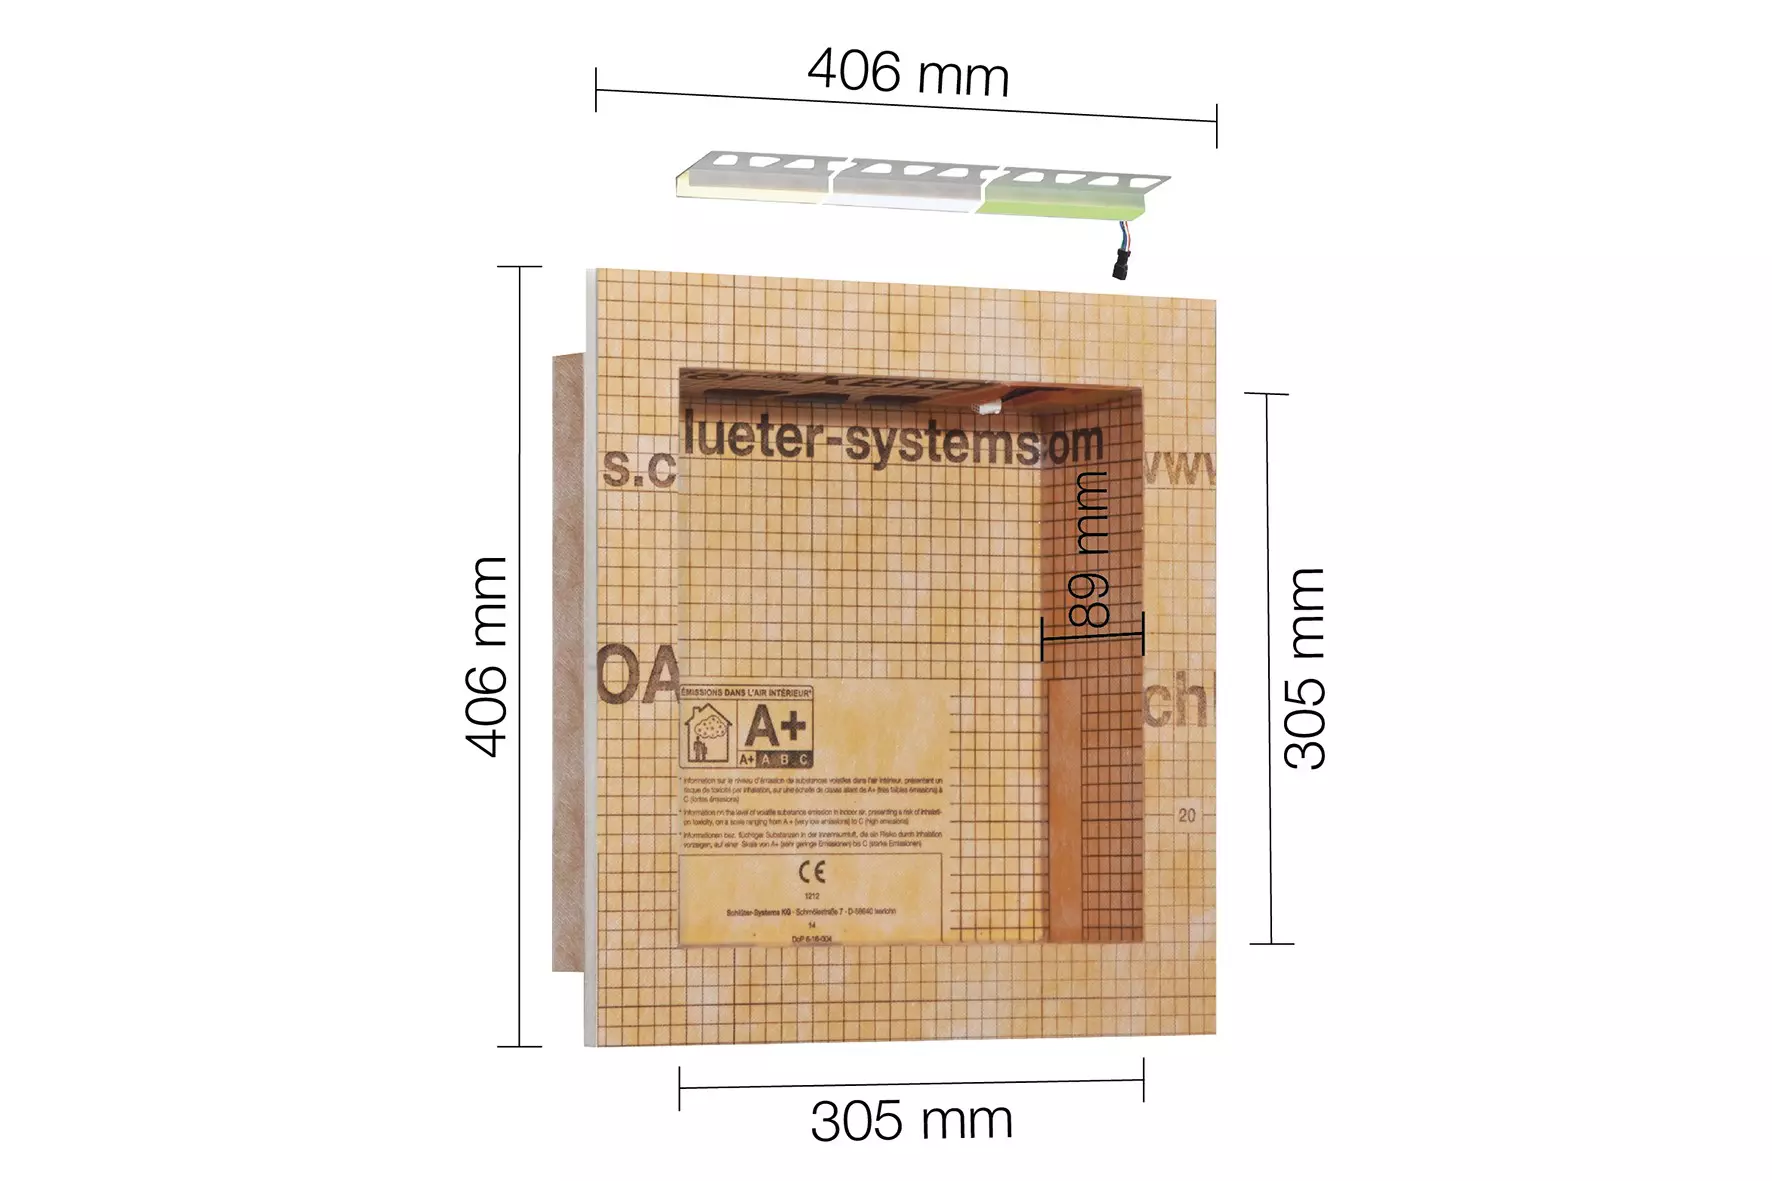
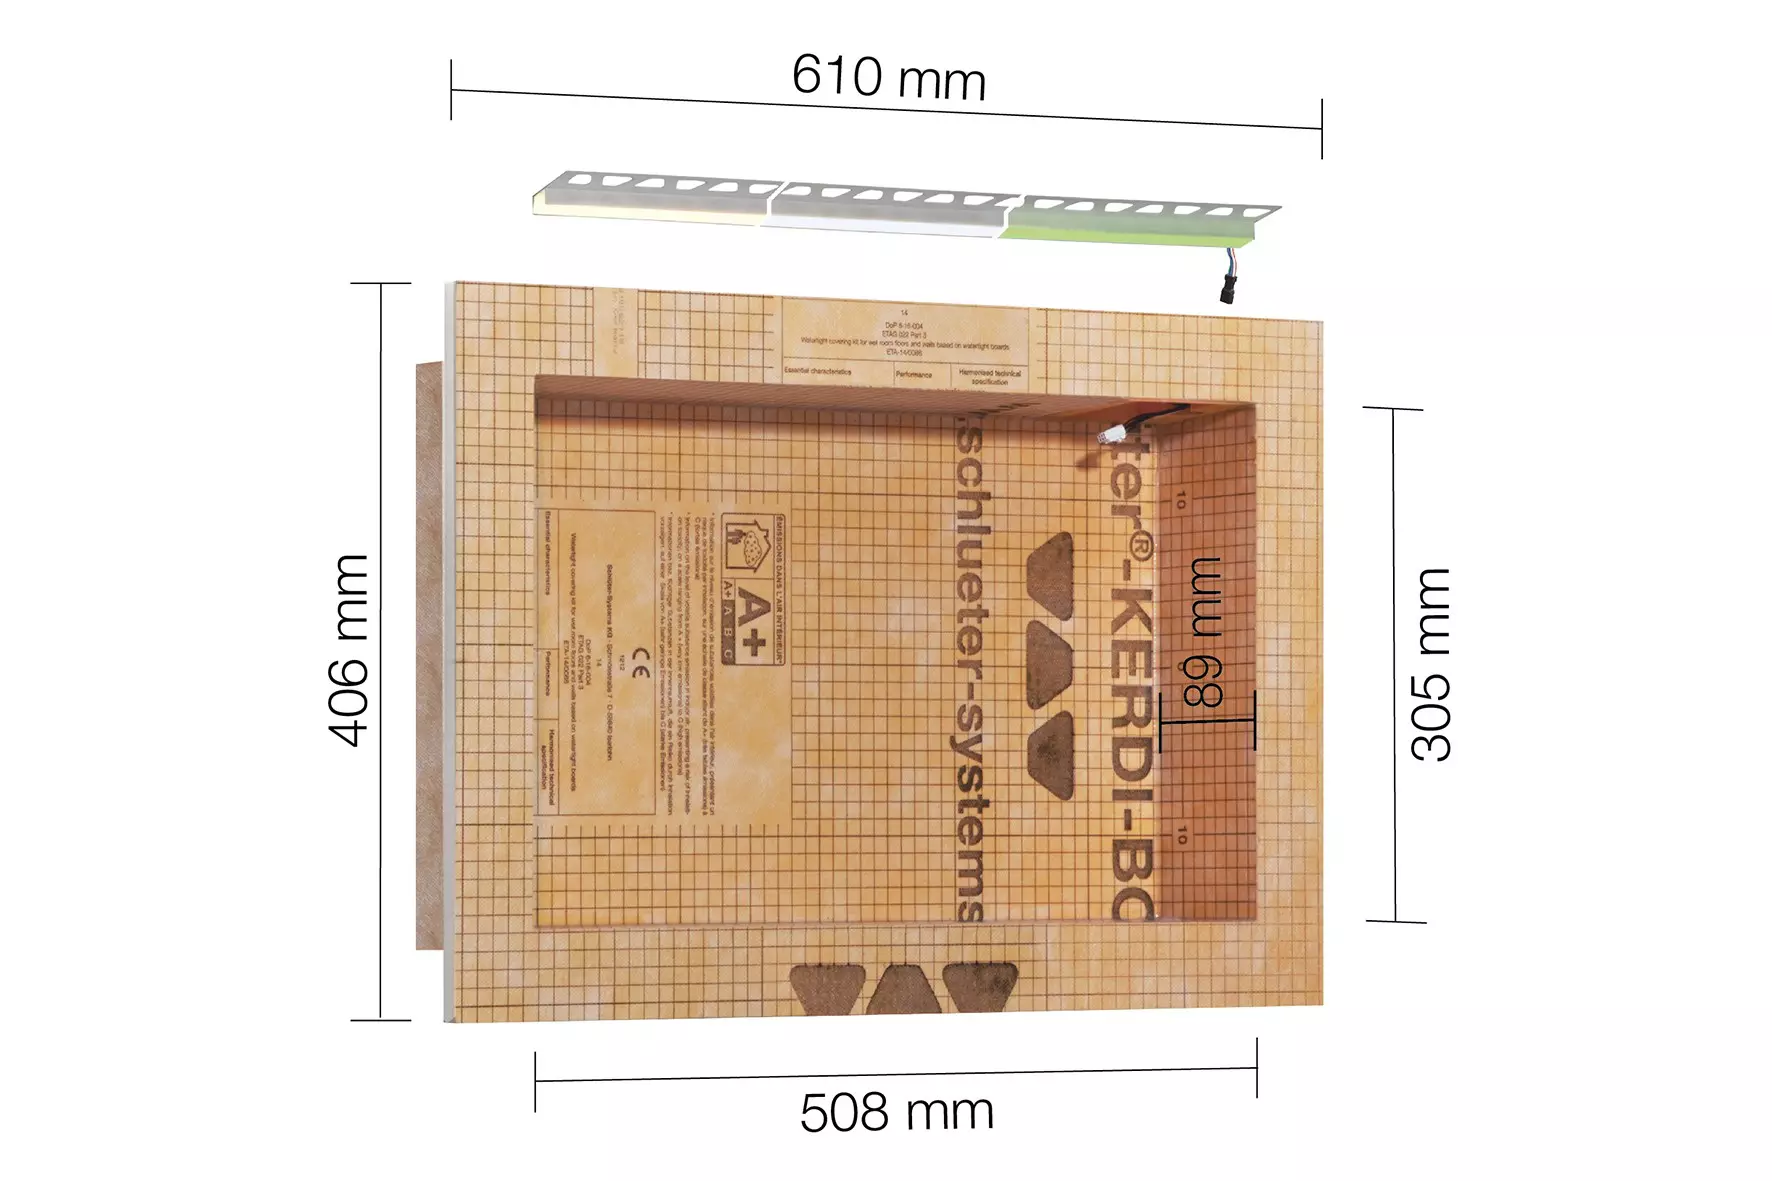
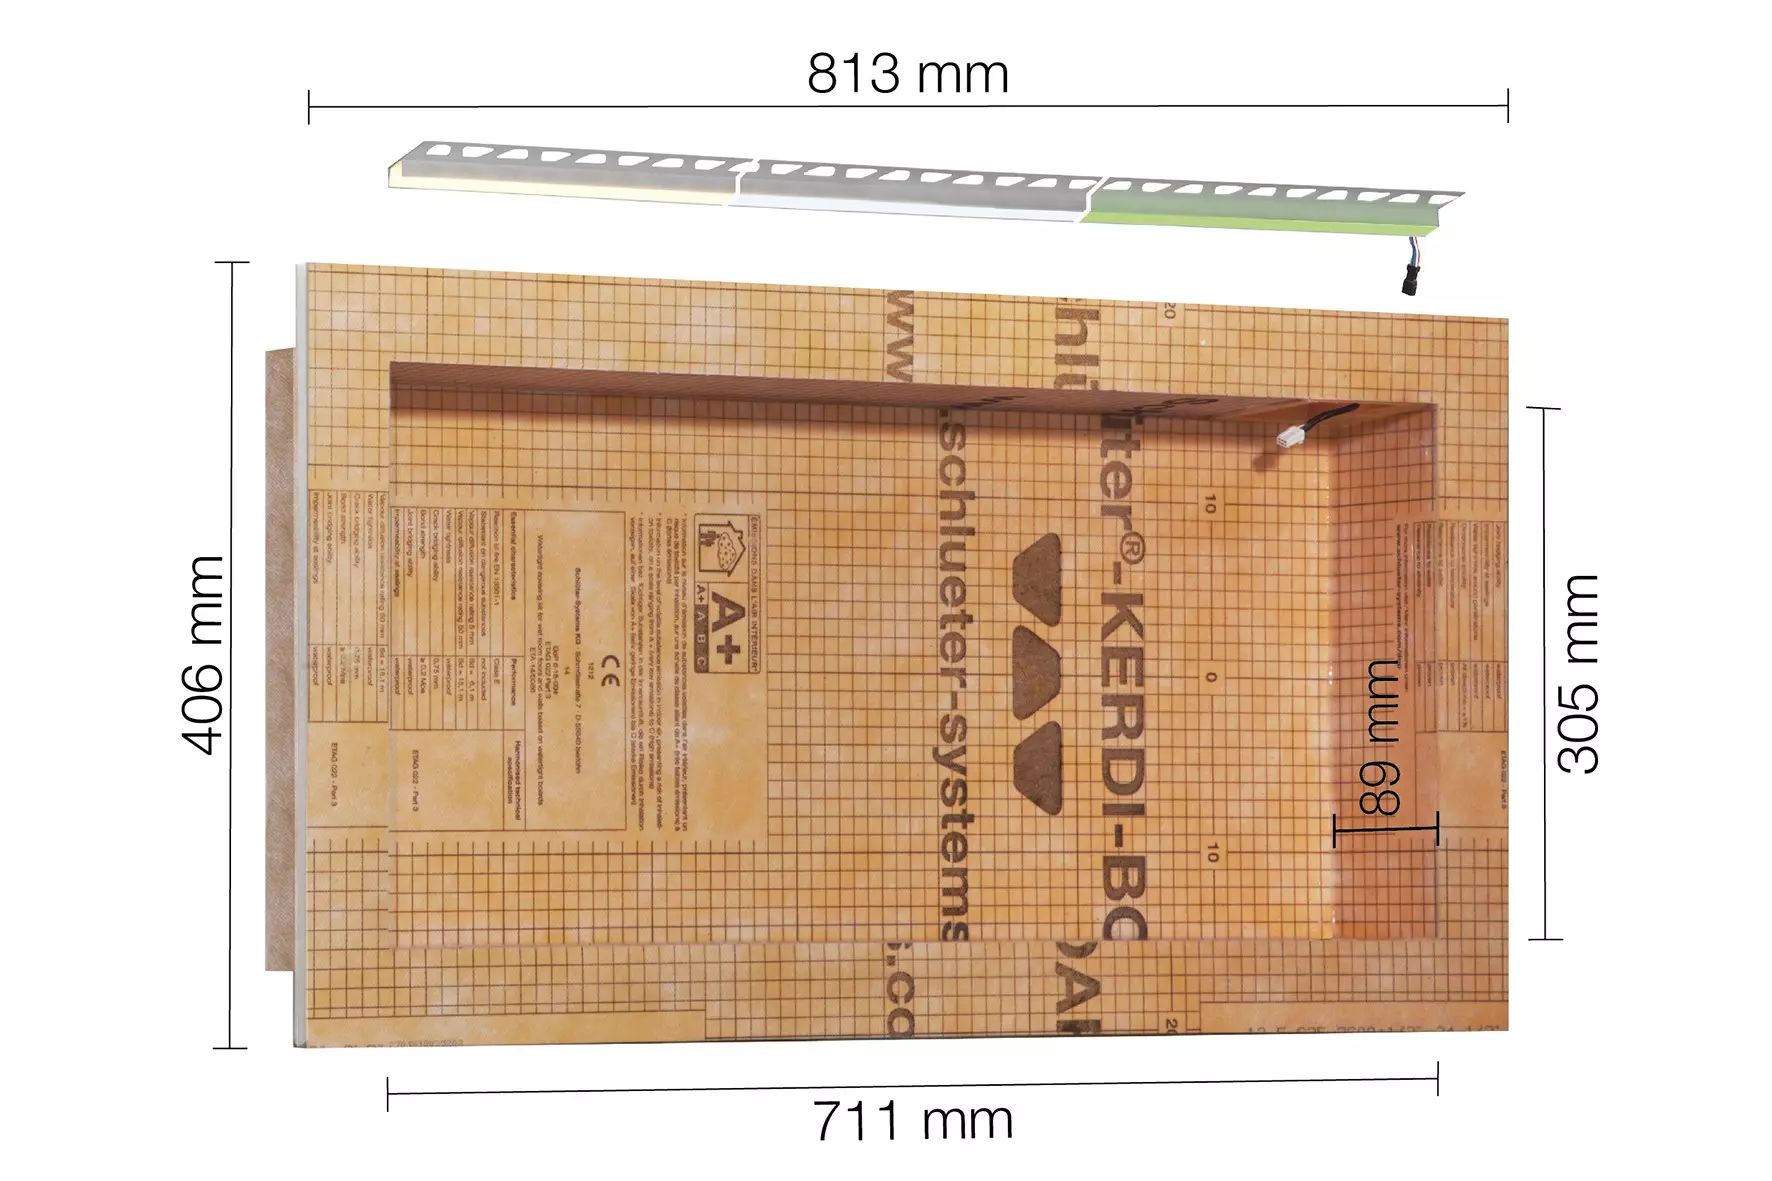
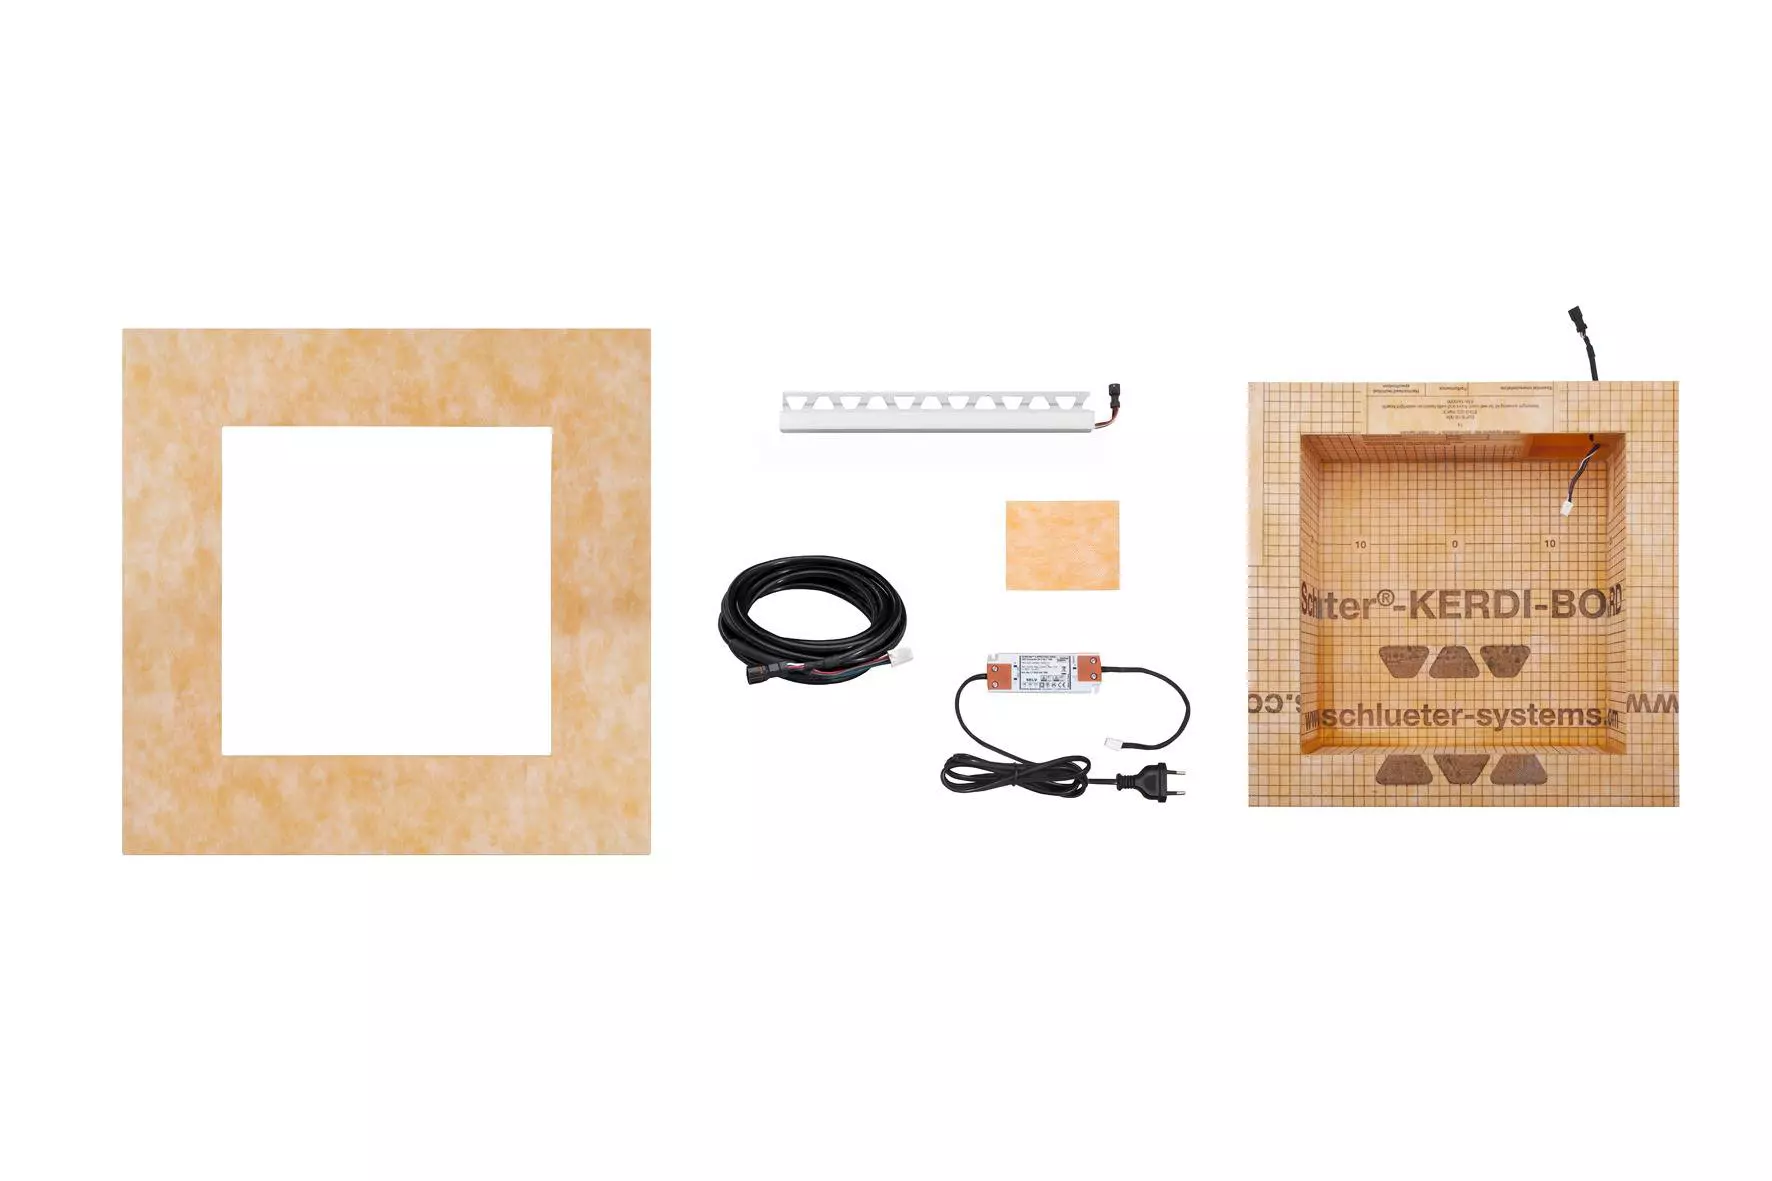
Schlüter-KERDI-BOARD-NLT is a panel of extruded rigid XPS foam with a thickness of 12.5 mm, laminated on both sides with a special, cement-free reinforcement material and a fleece fabric for effective anchoring of thin-bed mortars or rendered covering materials. One surface of the board is printed with 10 x 10 mm gridlines.

Material properties and areas of application

KERDI-BOARD-NLT is waterproof and resistant to any chemical stresses that typically occur in conjunction with tiled coverings. Where required, certified bonded waterproofing can be created in conjunction with Schlüter-KERDI or KERDI-BOARD.

KERDI-BOARD-NLT is completely flat and even when exposed to temperature or moisture fluctuations on one side will not warp, is ageing-resistant and highly stable.

KERDI-BOARD-NLT is ideal for a wide variety of applications.

Substrates should be checked for sufficient stability and other project-related requirements.

In special cases, the suitability of Schlüter-LIPROTEC modules should be verified on the basis of the anticipated chemical or mechanical stresses. The information below can only serve as a general guideline.

Anodised aluminium: Thanks to the anodising, the aluminium features a refined finish that retains an unchanging appearance during normal use.

Aluminium is sensitive to alkaline media.

Cementitious materials, in conjunction with moisture, become alkaline. Depending on the concentration and length of exposure, this may result in corrosion (aluminium hydroxide formation).

For this reason, remove mortar or grouting material immediately from all visible areas and do not cover freshly laid coverings with foil.

How to look after this product

Schlüter-LIPROTEC modules require no special maintenance or care. Abrasive cleaning agents should not be used on sensitive surfaces. Damage to the anodised surfaces can only be made good by coating with lacquer or similar.

All cleaning agents must be free of hydrochloric or hydrofluoric acid or naphtha (which is an ingredient in silicone removers).

Downloads