Schlüter-DESIGNBASE-CQ/Z  Protective sealing lip

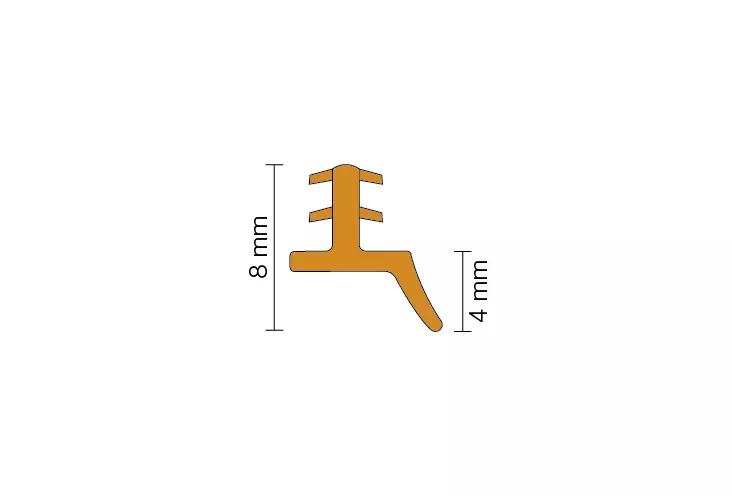
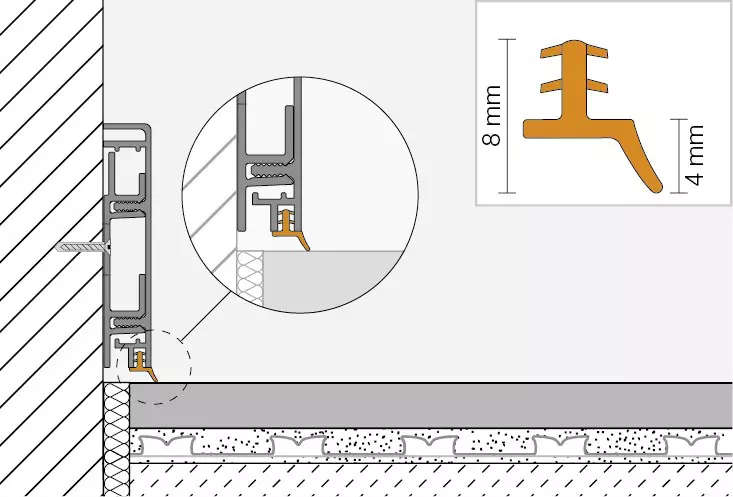
Pastel grey or brilliant white: The matching sealing lips for Schlüter-DESIGNBASE-CQ profiles are available in two colours and can be harmoniously matched with the colours of additional elements.

The optional sealing lips are not just part of the design, but also have two key functions:

  • Protecting the edge joints from moisture
  • Reducing impact sound

Product image DESIGNBASE-CQ/Z 1©Schlüter-Systems KG
Cross-section drawing DESIGNBASE-CQ/Z 1©Schlüter-Systems KG
zoom_out_map search
Product image DESIGNBASE-CQ/Z 1
Cross-section drawing DESIGNBASE-CQ/Z 1

General product information

What this product does

The sealing lip is available in a convenient 2.5m length.

How to install this product

Install Schlüter-DESIGNBASE-CQ on the wall as follows, using the spacers included in the package and the screw set.

  1. Place the spacers on the floor in front of the wall and position the support profile.
  2. If using the Schlüter-DESIGNBASE-CQ/Z sealing lip that is available as an accessory in the floor area, place the included spacers on top of the spacers positioned in the previous step. You also have the option to use the sealing lip as a finishing edge at the top of the profile.
  3. Trace the pre-perforated elongated openings on the wall. Use a drill (diameter 6 mm) to prepare 40 mm deep holes for the supplied wall anchors.
    Note: The support profile may also be installed without height adjustment via the guide groove.
  4. The skirting profile can be supplemented with the angled shadow joint profile Schlüter-DESIGNBASE-CQ/SG (not included).
    It is placed in the designated area of the support profile. It can also be attached to wall areas with the installation adhesive Schlüter-KERDI-FIX.
    Immediately remove any excess adhesive with a suitable cleaning product.
  5. If using the sealing lip Schlüter-DESIGNBASE-CQ/Z, integrate it into the design profile before placing the design profile on the support profile.
    If the sealing lip is installed in a corner, leave it slight longer in the area of the abutting profiles. Then use a utility knife to cut out a groove of about 10 mm for each side in the upper part of the sealing and to mitre the lower part of the sealing lip at a 45 degree angle.
  6. Now remove the spacers and evenly press the design profile on the support profile.
  7. Slide the corner pieces, if using, laterally into the profile.

Downloads